Search

How to correctly perform a drop-based calcium test

Table of Contents

The Ca Smart test kit is designed for quick measurement of calcium concentration in marine aquariums. Drop-based tests in marine aquaristics are an essential tool for monitoring the level of importaHow to correctly perform a drop-based calcium testnt parameters in water. Calcium is crucial for the health of corals, crustaceans, and other marine organisms. The article provides steps that should be followed to correctly perform a drop-based calcium test.

Becoming familiar with important information from the folded instruction manual

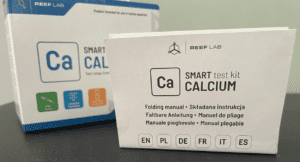
Before you start performing drop-based tests, make sure to thoroughly familiarize yourself with the folded instruction manual included in the package. It contains essential information about the Ca Smart test kit in 6 languages (EN, PL, DE, FR, IT, ES).

This is important, even if you have previously used drop-based tests. Each manufacturer may have slightly different recommendations.

Checking the contents of the package

Before starting, check that the package contains all the items listed in the contents specified in the paper folded instruction manual.

How to correctly perform a drop-based test

You can perform the drop-based test in two ways: manually, following the paper instructions included with the package, or by scanning the QR code from the abbreviated instructions, where an interactive version will guide you step by step. The choice is yours.
 

How to correctly perform a drop-based test – instructions

Step one – collecting seawater

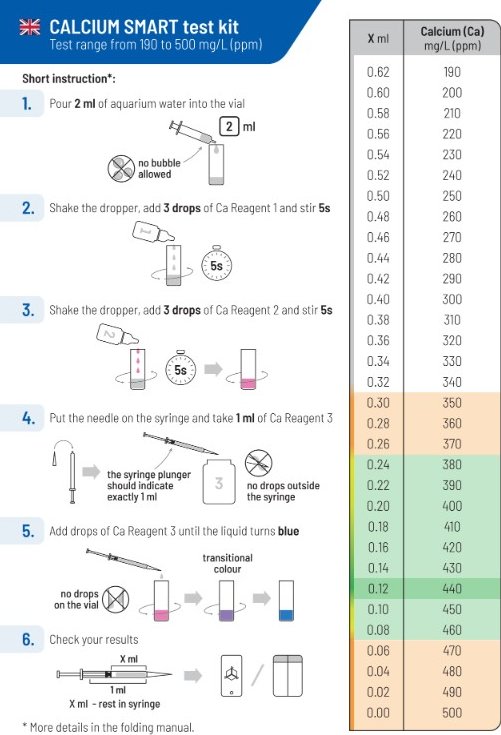
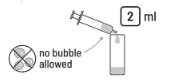
Draw 2 ml of seawater from the aquarium using a syringe (without air bubbles) and pour it into a test tube.

Additional tips:

  • To avoid drawing air bubbles, fill the syringe with water several times and empty it. This will help moisten the syringe walls and reduce the possibility of bubble formation.
  • Do not collect water immediately after adding chemical preparations containing calcium, cleaning the aquarium, or immediately after changing the water (wait a few hours).


Step two: Adding Ca Reagent 1

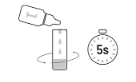
Shake the Ca Reagent 1 dropper, then add 3 drops of the liquid to the test tube. Gently stir the solution with circular motions for 5 seconds.

Additional tips:

  • If the dropper has not been used for a while, it’s a good idea to make the first drop a “test” drop (squeeze one drop onto a paper towel, for example). 
  • Pour the Ca Reagent 1 drops directly into the test tube so that they do not settle on its walls. If the drops remain on the side, gently tap the test tube against the table surface to make them flow into the water. 
  • Cloudiness in the sample after adding Ca Reagent 1 is a normal occurrence.


Step three: Adding Ca Reagent 2

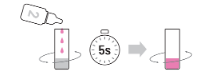
Shake the Ca Reagent 2 dropper, then add 3 drops of the liquid to the test tube. Gently stir the solution with circular motions for 5 seconds. The liquid in the test tube should turn pink.

Additional tips:

  • If the dropper has not been used for a while, it’s a good idea to make the first drop a “test” drop (squeeze one drop onto a paper towel—it should stain). 
  • Pour the Ca Reagent 2 drops directly into the test tube to ensure they do not settle on the sides. If any drops remain on the side, gently tap the test tube against the tabletop to make them flow into the water. 
  • If the pink color is very faint, you may add one more drop of Ca Reagent 2. A more intense color will make it easier to notice the color change in subsequent steps. An extra drop will not affect the result.
 

Step four: Drawing Ca Reagent 3

Attach the dispensing needle to the 1 ml syringe and draw 1 ml of Ca Reagent 3. The end of the plunger should align exactly with the 1 ml mark.

NOTE: Air between the fluid and the plunger does not affect the accuracy of the test. There should be no drops of reagent on the outside of the syringe.

Additional tips:

  • When filling the syringe (with needle) with Ca Reagent 3, it is recommended to fill it above 1 ml, and then release the excess to adjust the syringe plunger to exactly 1 ml. 
  • The presence of a small air bubble, or free space, in the syringe is a normal occurrence.
  • Ensure there are no drops of reagent on the external surfaces of the needle. If there are any, they should be removed, for example, by wiping with a paper towel.


Step five: Dispensing Ca Reagent 3

Using the syringe with the dispensing needle, add Ca Reagent 3 drop by drop directly into the liquid in the test tube, ensuring it does not stay on the walls. Stir the test tube after each drop and observe the color change.

The pink solution will gradually begin to change to a transitional purple color. When you notice that the liquid has turned blue – stop adding drops. If the remaining Ca Reagent 3 in the syringe has not been contaminated, you can pour it back into the bottle.

Additional tips:

  • The transitional color can sometimes be difficult to discern with the human eye; the important change to watch for is from pink to blue.
  • If you have used the entire syringe and the test tube remains pink, it is likely that you have more calcium than the calcium detection range in the Ca Smart test kit (>500 ppm).


Step six: Reading and recording the result

Read the amount of Ca Reagent 3 remaining in the syringe as indicated by the syringe plunger (X ml).

Compare it with the result table and/or enter it into the user panel in our app.

Additional tips:

  • The colors in the results table help determine whether the outcome is correct or out of range. The green area indicates a correct result, while orange signifies a result that is too high or too low.
 

About author

Picture of Magdalena Metzler

Magdalena Metzler

Privately, I am a mother and a lover of nature and sport. My main interest is quantum chemistry, which hides a whole lot of unsolved mysteries and connections, which is extremely exciting from a scientific point of view.
In my scientific career, I have conducted international projects focused on innovative solutions for many branches of business, e.g. automotive, construction, and now, of course, marine aquaristics.
Working at Reef Factory gave me a passion for marine aquaristics, which I can develop every day, building a chemistry department and creating products that will help aquarists take care of tanks and ensure the highest safety of animals. One of the most exciting memories of working at Reef Factory is the commissioning of the ICP-OES spectrometer, which analyzes the elemental composition of seawater. The method of analysis in ICP is based on an analytical technique, which is a combination of my passion for quantum chemistry and marine aquaristics.
I hope you find my articles on ReefPedia interesting and helpful! Happy reading :))