Table of Contents
Among many available food sources, phytoplankton – a single-celled and autotrophic organism – is unquestionably one of the simplest, cost-effective, highly nutritious, and widely used aquarium foods.
Of course, the best solution is to cultivate your own phytoplankton. As a result, you can continuously feed the tank inhabitants – instead of opting for an alternative route, which is to regularly purchase live phytoplankton from local stores.
Which animals and organisms eat phytoplankton, and why is it worth adding to an aquarium?
Live phytoplankton provides many invaluable benefits. The main benefit of dosing phytoplankton into a saltwater tank is that it absorbs nitrates and phosphates. This means a reduction in the levels of NO3 and PO4 in your tank. Additionally, phytoplankton consumes CO2, resulting in higher pH.
Another benefit of using phytoplankton in the tank is providing food for filter-feeding animals. Creatures such as copepods and mussels benefit from a natural food source that isn’t naturally present in the tank. An additional advantage is that corals feeding on micro particles will also consume phytoplankton, leading to faster growth and better coloration.
What is phytoplankton?
Phytoplankton are microscopic, single-celled organisms that live in aquatic environments (freshwater and saltwater) and provide ideal conditions for their growth and reproduction.
Phytoplankton typically inhabits the well-illuminated surface layer or euphotic zone of the sea, lakes, oceans, and other bodies of water.
Phytoplankton comprises various taxonomic groups: cyanobacteria (Cyanophyta, Cyanobacteria), green algae (Chlorophyta), diatoms (Bacillariophyceae), dinoflagellates (Dinoflagellata).
These organisms form the basis of freshwater and marine food webs. Additionally, phytoplankton is a primary producer or autotroph – an organism capable of producing its own food, utilizing solar energy to transform inorganic molecules, such as carbon dioxide, into energy-rich organic compounds and oxygen.
Essentially, phytoplankton obtains its nourishment through the synthesis of its cellular components in the presence of light energy. Thus, the process by which food production occurs is called photosynthesis.
In aquaristics, several species of phytoplankton are cultivated to meet the nutritional needs of microfauna. Such species include the well-known and commonly used Nannochloropsis oculata, as well as others such as Isochrysis galbana and Tetraselmis spp.
The equipment needed for phytoplankton cultivation
- Live phytoplankton or starter culture (about 0.5 liters) – we need a so-called starter batch, which is the right amount of ready-made phytoplankton that we decide to multiply.
- F/2 fertilizer – this is a formula developed by Guillard in 1975. It includes nitrates, phosphates, silicates, and trace elements. It serves as food for phytoplankton, without which it could not multiply.
- Refractometer – an instrument for measuring salinity levels.
- Air pump – a regular air pump, available in any pet store.
- Rigid air tubing – it will help us deliver air to the bottom of the tank where we will conduct the culture.
- Flexible air tubing – to connect the air pump to the container.
- Marine salt mix for aquariums – it can be any salt for marine aquariums.
- Lighting (LED lamp) – it doesn’t have to be a light hanging over the tank. A small LED light, for example, to light a nano tank with freshwater, is enough.
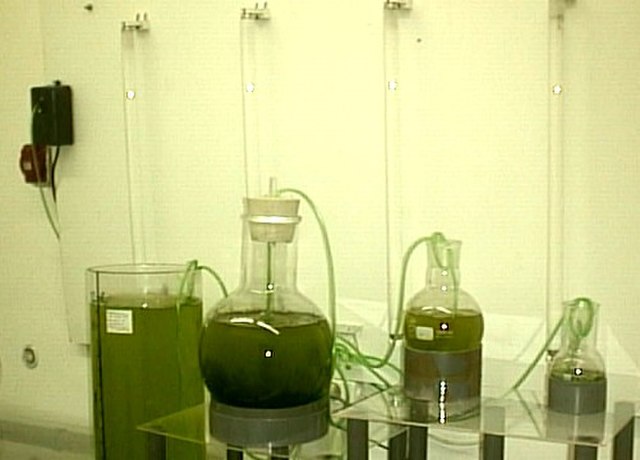
- 2-liter container in which we will cultivate our phytoplankton – preferably glass, scratch-resistant with any lid, it doesn’t have to be airtight, but it would be good if it were well-fitted.
- Clean fresh water (RODI) – the type we use to top up the level in our tank.
- Pipette or syringe.
- Timer (optional).
- Airline splitter (optional).
- Check valve (optional).
Preparing the container for growing phytoplankton
- First, prepare the container or vessels for cultivation by sterilizing them with vinegar and water or alcohol to prevent contamination.
- Then, drill two holes in the cap of each cultivation vessel, one for connecting the air tubing to the air pump and the other to facilitate gas exchange.
Note: Leaving the container open increases the risk of water contamination. We don’t want anything to get in there! - Cut the rigid air tubing slightly shorter than the total length of the container, and then insert it into the base of the container/bottle, making sure the rigid air tubing passes through the bottle cap. Bend the rigid air tubing slightly at the top to create a bend or “U” shape.
- Connect the rigid air tubing to the flexible air tubing, and then connect it to the air pump to provide adequate airflow. The bubbles should be strong enough to mix the entire container, and the flow should be about 2 bubbles per second. If you have multiple containers, connect all the tubes to the airline splitter and extend it to the air pump.
Important: Do not use an airstone, as it will create micro air bubbles and simply defat your phytoplankton (it will act as a skimmer in the sump).
Note: Make sure you have installed a check valve to bridge the air tubing. This helps prevent water backflow, especially during power outages. An airflow regulator is also required to allow flow regulation – the amount of flow that the cultivation vessel receives.

Creating the nutrient solution
Now it’s time to create the culture media.
- Essentially, the culture media is a mixture of saltwater solution and growth fertilizer. To achieve this, pour high-quality marine salt mix into 2 liters of freshwater RO/DI and make sure you reach a specific gravity of 1.019 – 1.026 for the best results. Measure this using a good refractometer or another salinity meter.
Note: The pH should be higher than 8.0 – ideally 8.2.
Important: Never use old water from your tank! It must always be freshly mixed saltwater. - Then, pour the salt solution into containers and add live phytoplankton and fertilizer. Do not overfill the container; leave some space as an air gap.
- Next, shake the bottle of F/2 fertilizer and add according to the manufacturer’s instructions. Use a measuring syringe or pipette to measure the correct amount.
What should you pay attention to when cultivating phytoplankton?
In cultivating phytoplankton as food for aquariums, it’s important to pay attention to the conditions we need to meet for our culture to thrive.
- Lighting
The essence of artificial lighting is to provide a source of energy that facilitates photosynthesis – enabling the growth and reproduction of algal cells in the cultivation vessel.
Therefore, it’s essential to maintain a minimum light-to-darkness ratio of 16:8 hours per day. I know that some aquarists even tend to leave the light on for the entire 24 hours without any noticeable problems. The opacity of the cultivation vessel will affect the amount of light penetrating through it. Therefore, a transparent, plastic container is a good choice for phytoplankton cultivation. - Temperature
Phytoplankton may not thrive well in extreme temperature conditions, but when it comes to Nannochloropsis oculata, it will grow well at room temperature. - Waterflow
The presence of bubbling movement (aeration) in the cultivation vessel helps distribute nutrients and microalgal cells throughout the container. It also facilitates gas exchange, allowing phytoplankton to remain in good condition.
Importantly, this promotes the even distribution of essential nutrients, maintains pH levels, and encourages rapid growth/multiplication of phytoplankton cells. That’s why you need an air pump for your cultivation.
Note: If you notice that the culture looks somewhat lighter on the second day, it’s because much of the phytoplankton settled at the bottom. You can stir it with a spoon and/or increase the flow a bit. Don’t let it stay at the bottom, as it may suffocate and die. - Fertilization
The cultivation medium typically consists of saltwater enriched with nutrients through the use of F/2 fertilizer in the appropriate dosage.
This fertilizer contains adequate amounts of nitrates, phosphates, and other essential nutrients that support high yields of algae.
Collecting phytoplankton culture
The algae biomass in the cultivation vessel will reach a high density (indicated by a dark green color) after a few days – usually between the 5th and 7th day.
Under favorable conditions, the cell divides up to 8 times a day. As it grows (7-17 days), the phytoplankton enters a “balance” phase between the number of phyto cells, nutrient availability, free space, and other conditions.
The “decline” phase begins on the 17th-25th day. You’ll see cells start to die and settle at the bottom of the container.
Now you can proceed to collect about ½ or ⅔ of the cultivated phytoplankton culture into a separate, clean container. You can use it in the tank or leave it to expand your cultivation.
Storing phytoplankton culture
The collected phytoplankton cultures should be properly packed and stored in the refrigerator until use. DO NOT place them in the freezer!
Also, make sure to shake the bottles daily to prevent the settling of phytoplankton cells at the bottom, as this may cause spoilage.
This way, you can easily store it for up to 3 months.
Summary
Cultivating phytoplankton is a great and effective way to minimize the high costs associated with feeding aquarium fauna.
Phytoplankton is quite easy to cultivate as long as you provide it with the proper conditions, such as lighting, aeration, nutrition, and salinity, which support its growth.
The total cost of phytoplankton cultivation is minimal compared to many other feeding options. Ultimately, even beginner hobbyists may be able to cultivate a significant amount of fresh phytoplankton for their tanks.
About the author

Marek Protasewicz
Reefkeeping has been my passion for over 10 years now. I love learning. The hobby has taught me many valuable lessons, patience being the best example. Combining work and passion is my path. I run Crazy Coral, a marine aquarium shop, for a number of years. Building this business from the scratch I learnt from my own mistakes at a heavy cost.
Later I managed a project aimed at development of methods for quick growth of Corals in non-natural conditions. The project was carried out by Get Sales, Poland. Presently, I am responsible for distribution strategy at Reef Factory, of which I am a co-founder. The company produces smart devices for marine aquaristics. The last projects I have been involved in are Social Reef and ReefPedia.


